Please follow me on Facebook! Like Me!
Saturday, October 29, 2011
Friday, October 28, 2011
Like a Kid in a Candy Store...
76,000 SQUARE FEET of crafty goodness has opened just 45 miles north and east of where I live and I will be on my way tomorrow to experience Hobby Lobby for myself! I've been in one once, when I was visiting family in Illinois. I fell in love and I only had the time to check out the scrapbooking section. I CANNOT wait to walk thru the ENTIRE store! Timing is actually perfect. Planned to meet the BF for a date tomorrow afternoon just a mile or so from the new store's site and it dawned on me that the store might have actually opened (I've been waiting for months since I heard Temecula was the future home of Hobby Lobby!). He did sound relieved that I planned to go shopping and oogling BEFORE I met up with him. He's a very patient man and on our first date we went antiquing and craftstore hopping (yes, I was testing him and yes, he passed with flying colors), but walking around a craft emporium just after getting off a full day's work for some reason just does not appeal to him. ;0) Silly man! I better get my mad money out. I think I might be doing some splurging tomorrow!
Okay, blog readers...what is your very favorite place to shop for your crafty items and why? What is the best deal you've gotten? And what item are you currently coveting most and hope to find under your holiday tree?
Happy weekend to all!
Okay, blog readers...what is your very favorite place to shop for your crafty items and why? What is the best deal you've gotten? And what item are you currently coveting most and hope to find under your holiday tree?
Happy weekend to all!
Thursday, October 27, 2011
Take a Break!
No, I have not been taking a break from knitting but sometimes, it is hard to post during the week. I've picked up a side job doing respite work for a lovely family...just a couple of hours twice a week giving them a little bit of a break but it has cut into my knitting and blogging time. I will get a little more organized this weekend so I am ready to post on the nights I am home and hopefully keep you all more up to date! In the meantime, here is my Bella Scarf pieced out, waiting to be sewn. I really need to work on my stitching of knitting pieces skills so I am waiting to practice more before I give this project a go to finish. It's a Christmas gift so I have a little time! I'm not procrastinating but I would be really disappointed if all this work wasn't complimented by some decent stitching.

Phat cat, of course, just had to get in the picture. :0) Until next time, peace love and yarn!

Phat cat, of course, just had to get in the picture. :0) Until next time, peace love and yarn!
Sunday, October 23, 2011
A Little Fall Fun!
After I finished my mitered coaster foursome in green, I was inspired to make a set for Halloween!

It was the idea for a Candy Corn mitered square that started the obsession.
 '
'
The next challenge was making a pumpkin so that it didn't resemble a carrot! (LOL)

I then made a few more striped versions in Halloween colors that I bought for a Trick or Treat drawstrng pouch I have in the works (still need work on that Kitchener stitch!).

I have based it off a super cute idea I saw from Lion Brand (http://www.lionbrand.com/patterns/90433AD.html?noImages=1&r=1 ) and will add the hand embroidery--and that's probably easier to do BEFORE I sew up the sides, note to self! I also just finished a super cute skeleton hat for my cousin's stepdaughter as a "big sister" gift. She's all into zombies and monsters, so I think she'll dig the skeletons!

Here is where I got it from: http://www.polarknitpatterns.com/Skull-Beanie-Worsted1.pdf. So, what do you think a good color combination would be for the next one I am going to make?
Happy Halloween, y'all!

It was the idea for a Candy Corn mitered square that started the obsession.

The next challenge was making a pumpkin so that it didn't resemble a carrot! (LOL)

I then made a few more striped versions in Halloween colors that I bought for a Trick or Treat drawstrng pouch I have in the works (still need work on that Kitchener stitch!).

I have based it off a super cute idea I saw from Lion Brand (http://www.lionbrand.com/patterns/90433AD.html?noImages=1&r=1 ) and will add the hand embroidery--and that's probably easier to do BEFORE I sew up the sides, note to self! I also just finished a super cute skeleton hat for my cousin's stepdaughter as a "big sister" gift. She's all into zombies and monsters, so I think she'll dig the skeletons!

Here is where I got it from: http://www.polarknitpatterns.com/Skull-Beanie-Worsted1.pdf. So, what do you think a good color combination would be for the next one I am going to make?
Happy Halloween, y'all!
Saturday, October 22, 2011
Hip to be Square--Making Miterred Blocks!
This week's class project was mitered squares. In general, a miter is basically two points joined at a 45 degree angle. In knitting, you achieve this angle by inserting decreases in the middle of your work. As you decrease, the knitting begins to fold in on it's self. You cast on a straight line but end up with a pretty cool looking square! You can see that angle starting to create itself in the picture of my sample below...

Of course, any knitting involves the participation of certain furry felines (sigh)...if it moves, it needs to be caught!

Here is an example of the decrease I used..."sl 2tog knitwise, k1, p2sso"...or, "slip 2 together knitwise, knit one, pass 2 slip stitches over." Here I am slipping two stitches off the left needle, together in the direction like I would if I was knitting them...unknitted, to the right side.

I knit the next stitch and slide it onto my right needle. Then I pick up those two stitches that I slipped knitwise OVER the knitted stitch and slide it off my needle completely...like I would if I was binding the stitch off.

It's slowly getting more square like!


I added in another color to give it a little "punch" visually (that and well, the pattern called for it! lol).

Oh, and fyi, I knitted rows between the decreasing rows...

And viola...a square with a pretty 45 degree angle! I made a set of four. They need to be blocked but you get the idea!

We talked in class about attaching some felt to the bottoms to make a coaster. I may have to try this!

All ready to give away but I think I am going to keep these. I love the way that mitering looks and I really need some coasters!
Sunday, October 16, 2011
Scrapping for the Cure
I can't wait to do this next year! Check out this shared link to the article about an event located at my LSS (Local Scrapbook Store), Ever After (shared link)
Talk to the Hand...My First Attempt at Blocking

 I wish I could come up with something as profound as this quote to describe blocking and it's use in knitting, but someone else said it first and said it well. "Blocking is a method of stretching and shaping a finished knitted piece to reach the dimensions suggested in the pattern, to make two pieces that need to match the same size, or to make your stitches look nicer and more even." (http://knitting.about.com/od/learntoknit/a/blocking_knits.htm)
Of course, it sounds easy, doesn't it? I don't know why, but I've been extremely intimidated by the process. Mostly, I've just been afraid of stretching it out of shape, or, 'over blocking' somehow! Usually I take my finished piece to my mother and have her block it. Nothing like being able to call on dear mom to take care of my problems! But with this Bella Baseball Scarf, the pieces need to be blocked to make sure I get the correct shape for the next step...sewing them into trapazoid pieces and then sewing those pieces together. Eek! Why was I not intimidated enough by this scarf to just leave it be? Now that I've got all the pieces, I'm starting to freak out. I think it was all of those lovely cables, I just HAD to give more cabling a try!

I've got all of my pieces except for the two end pieces which just involve some simple stockinette knitting. And the sewing. Eek! The sewing! I will keep you posted on how it goes! Wish me luck with the blocking! Until next time...peace, love and yarn :0)
The Skinny on Intarsia
We tackled a new method of color work, called "Intarsia," in my knitting class this week.

I had really enjoyed the Fair Isle method of color work so I thought that I'd love Intarsia. Yeah, not so much. In Fair Isle, you carry all of the yarns you are using behind you. It makes for a very thick back of your knitted work. In Intarsia, you use multiple balls of yarn so that each time you change a color, you use another ball of yarn. If you look at the back of the "j" Intarsia sample, you'll see that I just kept changing balls of yarn and that the old colors weren't carried over.The back of the work is much thinner than with Fair Isle.


I've posted the pics from Fair Isle (left) so you can see the difference from the perspective of the back of the work.
When it comes to doing color work Intarsia style, you twist your yarn when you switch so that the stitches don't pull apart. Nothing like gaping holes in your work to distract from the image you are trying to create! This method will definitely need some work before I would use it in a project. However, there are some super cute Intarsia patterns out there so maybe I was too hasty when I declared in class that I was only sticking with Fair Isle. One of the newest craze I've noticed is...skull and cross bones. Though I'm not a fan of them personally, I do think that skulls and cross bones done in pink and purple would be super cute ;0)

I did managed a decently neat initial...if you don't look too closely! I do have to remind myself that it was just my first attempt...practice makes perfect, right?

Hope all is well in your crafty world! I'm almost done with the blocks for the Bella Baseball Scarf! Then the long, tedious process of figuring out how to sew them together will begin! I'm nervous but excited to see how it will look when I actually get done. I will keep you posted!
Thursday, October 13, 2011
Bachelorette Gift Idea!
Today I had a little knitting fun making up a condom cozy. Yes, you read it correctly!

A post on Knitting Paradise had a link to a website promoting safe sex and a plethora of patterns for "condom amulets." One looked like a particularly eye-pleasing pattern and the direction didn't look difficult; I have two girl friends who are close to being engaged so it's time to start thinking up shower and Bachelorette party ideas!


I also made it up just for laughs! There was a lot of interaction on the blog post but no one had made one...so I took it upon myself to be the knitter in residence for that particular project! I thought my mom was going to die of embarrassment when I told her what is was really for...she wants to make some but call them coin purses ;0)
The real kicker is that the site was started up by women in their 50's! If you are interested in checking out the other patterns, go to http://www.knitacondomamulet.com. I will note, I chose one of the more tame patterns...though tasteful, there are quite some unusual designs!
I also made up some designs of my own...


I adore the purse that turned out so well. The pink bag...not so much. I was trying to replicate a bobbles pattern (that I couldn't find) so I made something up but then couldn't figure out the kitchener stitch to bind it off...the picture is hiding my ugly seaming! But you get the idea...
What next will Jenn knit up? I've got some more fun, "not your grandma's scarves" type work that I will be making up and posting soon. Plus I am getting into Race for the Cure mode, knitting up green beanies for the Team Jil walkers. And there are Christmas presents to start on...whew, I've got a full plate. Until then...peace, love and yarn!
Wednesday, October 12, 2011
Vista Fiber Arts Fiesta!
Last Saturday was a a beautiful, warm fall day in SoCal. I drove out to the Antique Steam Engine museum located in the next city over, Vista, to check out the local fiber arts fiesta.

First I checked out the museum pieces...

Because I am a nerd and I figured...when is the next time I'll be out this way? (Lol)

The museum even hosts a model train display (N track) which would have made the BF very happy had he come with me (alas, but he had to work). Talk about the perfect date--yarn and model trains together in one venue! I took pictures of the model display in progress for him...

Then made my way to the Fiesta...

It is a very small event...just enough to keep you busy looking for an hour or two but still a very lovely event...
 Oh the beautiful yarn!! It was tempting but I managed not to buy anything to add to my stash....
 That didn't keep me from touching all of the fibers to check them out. I knew that the fiesta was hosting a BYOSW (bring your own spinning wheel) for the diehard purists who spin their own yarn but I didn't realize it was BYOA (bring your own Alpaca)!
 Aren't they cute?! I managed to not bring one of those home with me, either. I figure the cats are enough for the BF to deal with when he's over for a movie night. An Alpaca or two just might be too much. ;0) I also checked out some antique looms that they had up and running in part of the museum...
 It was just a lovely fall morning and while it's warm now, November usually brings the start of cooler weather. On my way home after the event I stopped by the Garden Center at Home Depot and picked up some fall loveliness to replant some of my flower pots...

Now it's time to sit back and start knitting up a storm. Got to use up more of the stash so I can have an excuse to buy some more!

First I checked out the museum pieces...

Because I am a nerd and I figured...when is the next time I'll be out this way? (Lol)

The museum even hosts a model train display (N track) which would have made the BF very happy had he come with me (alas, but he had to work). Talk about the perfect date--yarn and model trains together in one venue! I took pictures of the model display in progress for him...

Then made my way to the Fiesta...

It is a very small event...just enough to keep you busy looking for an hour or two but still a very lovely event...
 Oh the beautiful yarn!! It was tempting but I managed not to buy anything to add to my stash....
 That didn't keep me from touching all of the fibers to check them out. I knew that the fiesta was hosting a BYOSW (bring your own spinning wheel) for the diehard purists who spin their own yarn but I didn't realize it was BYOA (bring your own Alpaca)!
 Aren't they cute?! I managed to not bring one of those home with me, either. I figure the cats are enough for the BF to deal with when he's over for a movie night. An Alpaca or two just might be too much. ;0) I also checked out some antique looms that they had up and running in part of the museum...
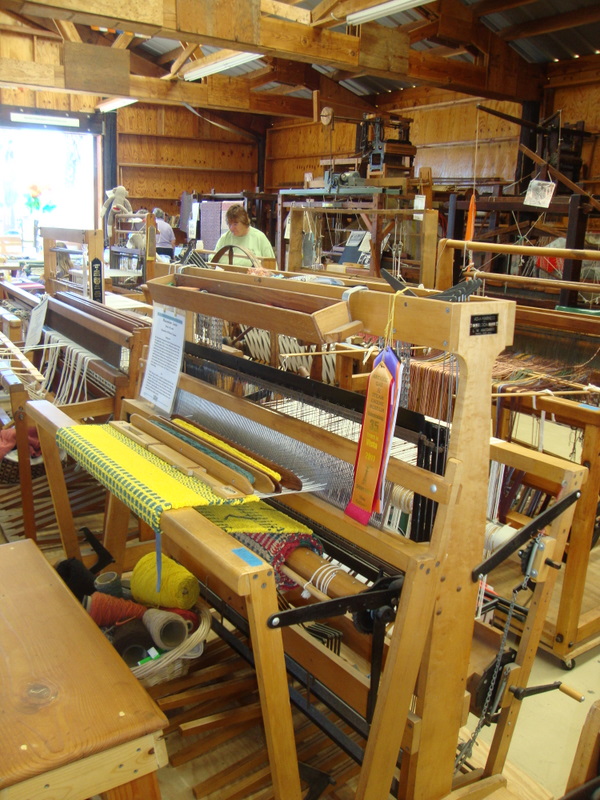 It was just a lovely fall morning and while it's warm now, November usually brings the start of cooler weather. On my way home after the event I stopped by the Garden Center at Home Depot and picked up some fall loveliness to replant some of my flower pots...
Now it's time to sit back and start knitting up a storm. Got to use up more of the stash so I can have an excuse to buy some more!
Monday, October 3, 2011
Viola! Embellished Pre-Made Cards
I really do other kinds of craft projects than just knitting! Admittedly, though, I've barely touched my card and scrapbook materials as of late...honestly, I've just been buying cards from the .99c section of Walmart and calling it good. It's the thought that counts, right? BUT I do enjoy embellishing pre-made cards from time to time and it's a great way to dig through my "stash" and remind myself of what I have!

I wanted to send some thank you notes to some girlfriends who helped me spruce up my resume for my current job search. I decided to 'throw in' a birthday card for the gal who is training to take my place at my current/soon-to-be old job just because it felt like the right thing to do. I mean, how many times does a gal turn 29?? Well, okay, she and I both have been spending quite a while at 29 but who is counting?!
I started with a gorgeous card that really didn't really NEED embellishing but who can say there's such a thing as too much bling?!?
 I found some paper flowers I'd just picked up from Michael's...at 60% off, they were BEGGING to be bought!

I added some ribbon, re-purposed from some type of ribbon that was on a gift last Christmas and decided to add a tag with my greetings. I was feeling lazy about getting out my alphabet stamps so I found a Zig marker and put on my best cursive.

Short, sweet and GORGEOUS if I do say so myself!

Hope the recipients enjoy looking at them as much as I enjoyed creating them! Now it's back to the knitting needles!

I wanted to send some thank you notes to some girlfriends who helped me spruce up my resume for my current job search. I decided to 'throw in' a birthday card for the gal who is training to take my place at my current/soon-to-be old job just because it felt like the right thing to do. I mean, how many times does a gal turn 29?? Well, okay, she and I both have been spending quite a while at 29 but who is counting?!
I started with a gorgeous card that really didn't really NEED embellishing but who can say there's such a thing as too much bling?!?
 I found some paper flowers I'd just picked up from Michael's...at 60% off, they were BEGGING to be bought!
I added some ribbon, re-purposed from some type of ribbon that was on a gift last Christmas and decided to add a tag with my greetings. I was feeling lazy about getting out my alphabet stamps so I found a Zig marker and put on my best cursive.

Short, sweet and GORGEOUS if I do say so myself!

Hope the recipients enjoy looking at them as much as I enjoyed creating them! Now it's back to the knitting needles!
Sunday, October 2, 2011
Twisted Sisters:The Bella Baseball Scarf...the Saga Begins!
I have finally started my personal knitting class project...the Bella Baseball scarf! It's SO gorgeous and it will be very challenging for me as it involves a lot of sewing AFTER all the knitting is done.

I started with the Horseshoe cable panels (see gray and purple matching panels right where the mannequin's hands are). Cables have been surprisingly uncomplicated for me to figure out since I learned them in my knitting class. There are all sorts of cabling tools to use, I prefer the "j hook" because it helps me keep my slipped stitches in order and I can use the longer straight end to knit or purl the slipped stitches. Apparently, though, it "may" make for a new cat toy so I'd better watch to make sure she doesn't try to take it for a game of fetch (yes, the Princess plays fetch!).
 Here is my first row of completed horseshoes. Talk about a twisted sister, there's all sorts of stitch stuff going on in there! You do, apparently, always make the surrounding stitches purled so that the cabled twists, which are done in stockinette, really show up.
 And just to see if you are curious about such things, this is the back. Yes, let's move on and not feel the need to go back and see it again (ugly!).

After purling the edge of the scarf panel, I'm ready to cable. I want my first twist to learn to the left, so I slip off three stitches and place the cable in front.

Now, I slipped three stitches because that's what the pattern told me to do...another kind of cable will require another amount of stitches to be slipped. So I knit the next three stitches on my regular knitting needle to match, and then go back and knit the three stitches on my cable.

I want the mirror image of my last cable, or have it go to the right so I place the next three stitches on a cable and move it to the back of my work. I knit the following three stitches on my normal knitting needle, then go back and knit the three that have been hanging around, waiting for me.

And viola! A horseshoe cable!

There are ten cables per panel, and a total of four panels. I still have more work to do. After blocking it (wet, gently stretch into shape, pin down and let dry), I'll need to add stitches on the SIDE of it and knit reverse stockinette (purl side showing).

Then it will be time to tackle the five diamond shaped panels...it's a project alright BUT it is going along well. Did two panels just today between chores and job hunting online so hopefully I'll have it done by Christmas, oops, I mean by the end of October when our class finishes up ;0)

I started with the Horseshoe cable panels (see gray and purple matching panels right where the mannequin's hands are). Cables have been surprisingly uncomplicated for me to figure out since I learned them in my knitting class. There are all sorts of cabling tools to use, I prefer the "j hook" because it helps me keep my slipped stitches in order and I can use the longer straight end to knit or purl the slipped stitches. Apparently, though, it "may" make for a new cat toy so I'd better watch to make sure she doesn't try to take it for a game of fetch (yes, the Princess plays fetch!).
 Here is my first row of completed horseshoes. Talk about a twisted sister, there's all sorts of stitch stuff going on in there! You do, apparently, always make the surrounding stitches purled so that the cabled twists, which are done in stockinette, really show up.
 And just to see if you are curious about such things, this is the back. Yes, let's move on and not feel the need to go back and see it again (ugly!).
After purling the edge of the scarf panel, I'm ready to cable. I want my first twist to learn to the left, so I slip off three stitches and place the cable in front.

Now, I slipped three stitches because that's what the pattern told me to do...another kind of cable will require another amount of stitches to be slipped. So I knit the next three stitches on my regular knitting needle to match, and then go back and knit the three stitches on my cable.

I want the mirror image of my last cable, or have it go to the right so I place the next three stitches on a cable and move it to the back of my work. I knit the following three stitches on my normal knitting needle, then go back and knit the three that have been hanging around, waiting for me.

And viola! A horseshoe cable!

There are ten cables per panel, and a total of four panels. I still have more work to do. After blocking it (wet, gently stretch into shape, pin down and let dry), I'll need to add stitches on the SIDE of it and knit reverse stockinette (purl side showing).

Then it will be time to tackle the five diamond shaped panels...it's a project alright BUT it is going along well. Did two panels just today between chores and job hunting online so hopefully I'll have it done by Christmas, oops, I mean by the end of October when our class finishes up ;0)
Subscribe to:
Posts (Atom)